Sous vide cooking strikes a fascinating balance. It can be incredibly simple, but can also get more and more complex as you dig deeper into the technique. Knowing when to use (or not use) an ice bath is one of the complexities, but we’ll break it down for you in this article. By the end, you’ll understand exactly what an ice bath does for your food, and be able to figure out whether you need to use one in your case.
As a general rule (with some exceptions), if you’re going to be serving your sous vide food immediately, you don’t need to put it in an ice bath. Instead, the sous vide ice bath technique is most vital when you’re going to be saving your food to reheat and consume later.
Table of Contents
What Is an Ice Bath for Sous Vide?
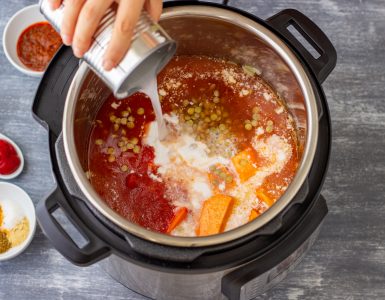
After sous vide food is done cooking, sometimes the best practice is to immediately plunge it into a container of water with plenty of ice in it. This extremely cold water bath quickly cools off the food, bringing down its temperature much more quickly than the refrigerator (or even freezer) would. Water transfers heat more quickly than air, which is why an ice bath is faster and more efficient than a freezer even if they’re at similar temperatures.
For anyone who has worked in the restaurant industry, this is a familiar technique. It’s an approved method for ensuring food safety by cooling it rapidly, bringing its temperature down and out of the “danger zone” as soon as possible. We love seeing that it’s becoming commonplace in the home kitchen too!
It’s important to note that sous vide food stays in its cooking bag for the ice bath. You don’t take the food out of the bag and then submerge it directly into the water without a barrier.
Using an Ice Bath for Food to Serve Later
You may have guessed by now that the most common purpose of a sous vide ice bath is to help save food for later. If you’re cooking in advance and intend to refrigerate or freeze your sous vide food, the best practice is to cool it thoroughly in an ice bath first.
Putting hot food directly into the refrigerator or freezer doesn’t cool it quickly enough to guarantee that it will get out of the temperature “danger zone” in time. And doing so might even raise the temperature of the refrigerator or freezer enough to impact other food items you’re storing. An ice bath is both more efficient and safer.
To use an ice bath this way, fill a large container with cold water and plenty of ice. Put in your bags of sous vide food, and make sure they’re fully submerged. Stir the bath every 5 to 10 minutes, leaving your bags in the ice water until the food has reached 40° F (4.4° C). At this point, your food has reached the lower limit of the “danger zone” and is ready to put in the refrigerator or freezer. (For an estimate of how long this will take for various foods, check out the useful thickness/time table at this link.)
If the ice in your bath melts significantly, add more. The goal is to keep it nice and cold without allowing the hot food to heat it up.
Using an Ice Bath for Food to Serve Immediately
The main purpose of an ice bath is to quickly and safely cool food to save for later. However, in certain circumstances, you might use an ice bath for food that you intend to eat right away.
The most common example of this is with steak. Once it’s done in its sous vide bath, your steak is perfectly cooked… but it’s missing that gorgeous sear and Maillard reaction on the outside. (In fact, a sous vide steak that hasn’t been seared can look pretty unappetizing.)
Of course the solution is to sear it, but then you risk overcooking the steak that you worked so hard to ensure was done perfectly. And what’s the point of sous vide if you’re just going to end up with overcooked meat anyway?
This is where an ice bath can come into play by helping you sear your food without overcooking it. Once your steak is done cooking and you’re ready to sear and serve it, transfer it (in its bag) straight from the sous vide bath to an ice bath. Leave it there for just 5 to 10 minutes. The goal this time isn’t to chill it all the way through, but simply to cool the outside layer significantly.
Remove the steak from the ice bath and its bag. Pat it dry and season it (yes, we recommend seasoning steak after it’s done in the sous vide bath, not before!). From there, sear it with your method of choice (we love a cast iron pan for this).
The cool outer layer that the ice bath created on the steak allows you to sear it without cooking it significantly further, because it needs to come all the way back up to temperature before it can actually start cooking again.
While steak is the most common example, you can use this technique any time you want to sear food right out of the sous vide bath and then serve it immediately afterward.
You may be able to skip the ice bath and achieve the same effect by simply tossing your bag of food into the refrigerator or freezer for 10 minutes. We do not recommend doing this if you’re making a lot of sous vide food, because adding large quantities of hot food to your refrigerator or freezer can be a food safety issue.
However, putting in just one or two bags away from other foods (so they don’t touch and warm up those foods) for 10 minutes shouldn’t be an issue. This will allow the outer layers of the food to cool off without the hassle of an ice bath, helping you to get that nice outer sear without further cooking the food itself.
Do I Really Need to Use an Ice Bath?
If you’re thinking about an ice bath for food that you plan to serve immediately, no. Using this kind of ice bath helps reduce the additional cooking of the food during the searing process. However, it’s not a necessity for health and safety purposes; it just helps you maintain the perfect cook that you achieved with the sous vide process. As mentioned above, you also have the option of simply putting a bag or two of food in the freezer for ten minutes to achieve the same effect.
However, if you’re asking about an ice bath for food that you’ll then refrigerate or freeze, we absolutely do not recommend skipping this step. It’s important to take food safety best practices seriously. And if you’ve ever had a bad case of food poisoning, you know that it’s not worth enduring that misery just to save the little bit of effort that an ice bath requires.
Another Type of Ice Bath for Sous Vide: Keeping Food Cool to Cook Later
If you’ve looked into some of the more technologically advanced sous vide immersion circulators, you probably know that many of them are WiFi-enabled. Many gleefully boast some variation of, “This means you can start your sous vide cooking from work and have dinner ready by the time you get home!”
That sounds great… but isn’t it dangerous to leave your food sitting out in a room-temperature water bath for half the day until you’re ready to start the cooking process?
Yes! And that’s where the second type of ice bath for sous vide comes into play. Instead of leaving your food in tepid water within the food temperature “danger zone,” put your food and sous vide circulator into an ice bath before you leave. Make sure you use an insulated container to help keep the ice water cold for as long as possible.
The ice bath should keep your food cold for several hours, ensuring that it stays at a safe temperature until you use that WiFi feature to start up the cooking process. Just keep in mind that it will take longer for the bath to come up to temperature since the water is starting off full of ice, and plan accordingly. Also make sure to use lots of ice so that it doesn’t melt too early!
Conclusion
Unless you’re planning to store your sous vide food in the freezer or refrigerator for later, an ice bath is optional. It rapidly cools the outer layer of your food, letting you get a nice sear without actually cooking the food more. However, it’s up to you whether that detail is worth the extra effort. On the other hand, if you do want to freeze or refrigerate your food for later, an ice bath should be non-negotiable. It brings the food through the temperature “danger zone” quickly, helping to ensure food safety (and this is why it’s a standard practice in the restaurant industry).