This page may contain affiliate links. If you make a purchase through one of these links, we may earn a commission at no extra cost to you.
Culinary foam is nothing new. If you’ve ever made whipped cream, a chocolate mousse, a lemon meringue pie, you’ve already made culinary foam (even if you didn’t think of it that way). Even bread is technically a foam!
But you may have noticed that in recent decades, these foams have taken on a new style. That’s because in 1994, Chef Ferran Adrià of world-renowned restaurant El Bulli started using foam in a new and innovative way. He called his new creation “espuma” to differentiate it from the familiar culinary foams that we’re all used to.
Unfortunately, El Bulli closed in 2011, so you won’t have a chance to try espuma in its original home. But you can create it in your own home, where your imagination can run wild. Read on to learn more about exactly what espuma is, and how you can make it yourself to create your own modernist dishes.
Table of Contents
What Is Espuma in Cooking?
Espuma is a culinary foam, typically savory rather than sweet, and generally made with a whipped cream dispenser. They are also often (though not always) served hot rather than cold.
The definition is a little bit vague and fluid. Technically, espuma doesn’t need to be either savory or made with one of these tools to qualify as espuma. ( And you’d have a hard time arguing that whipped cream is espuma just because you didn’t add sugar and made it in a whipping siphon.)
In fact, since the idea was to create something new and get away from traditional preparations, espumas were originally designed not to rely on milk, cream, or egg whites. That concept has relaxed a bit, but keep it in mind as you’re trying to get clear on what is or isn’t an espuma.
With all of that said, I recommend that you take the definition as guidance rather than rigid rules. Or, if you prefer, think of espuma as a modernist technique, and categorize foams accordingly.
Also, be aware that the word “espuma” simply means “foam” in Spanish and Portuguese. The word can be used in other contexts, and isn’t necessarily always referring to culinary foam!
Characteristics of Espuma (Plus Other Types of Foam)
As discussed in the “Definitions” section above, espuma is a somewhat fluid and flexible term. But here are some characteristics to help you understand what it is!
Espuma is generally:
- Fairly dense foam or mousse
- Served hot or warm
- Used in modernist cuisine
- Savory
- Made with an N2O charger
And espuma is generally not:
- Highly sweetened
- Traditional/familiar (like whipped cream or meringue)
- Hand-whipped
- Extremely light or airy
- Full of large bubbles
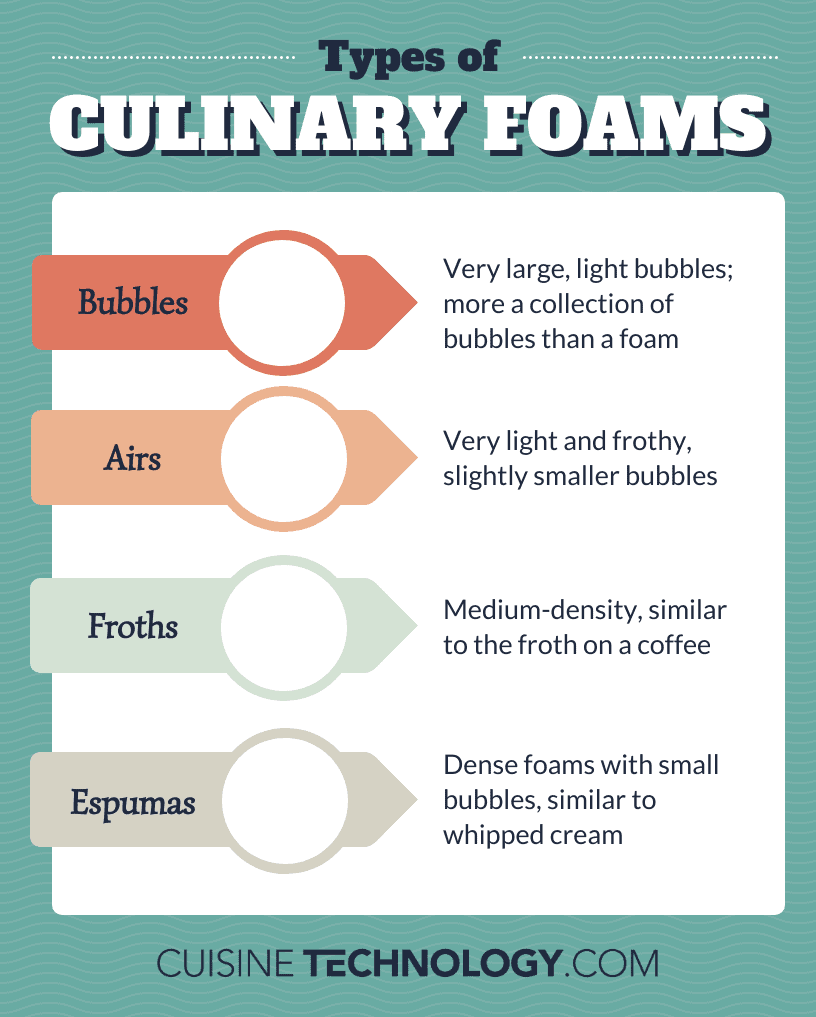
Particularly light foams, or those with large bubbles, are more likely to be called “airs” or “bubbles” than espumas. Froths fall somewhere in between the two, as they tend to be denser than airs but not as dense as espumas.
How Do You Make Espuma?
In concept, this is pretty easy!
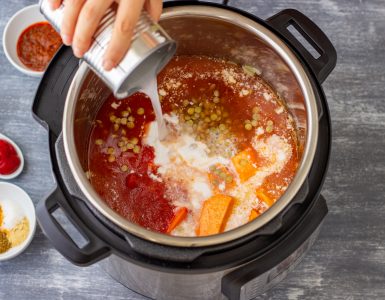
- Put your desired ingredients into your whipped cream dispenser (I recommend and personally use the iSi Gourmet Whip, which is rare in that it’s designed for both hot and cold applications)
- Charge the dispenser with an N2O charger
- Shake the dispenser a few times
- Dispense your espuma!
And most of this is really as easy as it sounds. The only complicated part is figuring out exactly which ingredients to use to achieve the result you want. You’ll need to consider not only flavor and temperature, but also which additives (if any) to use to achieve your desired texture and stability.
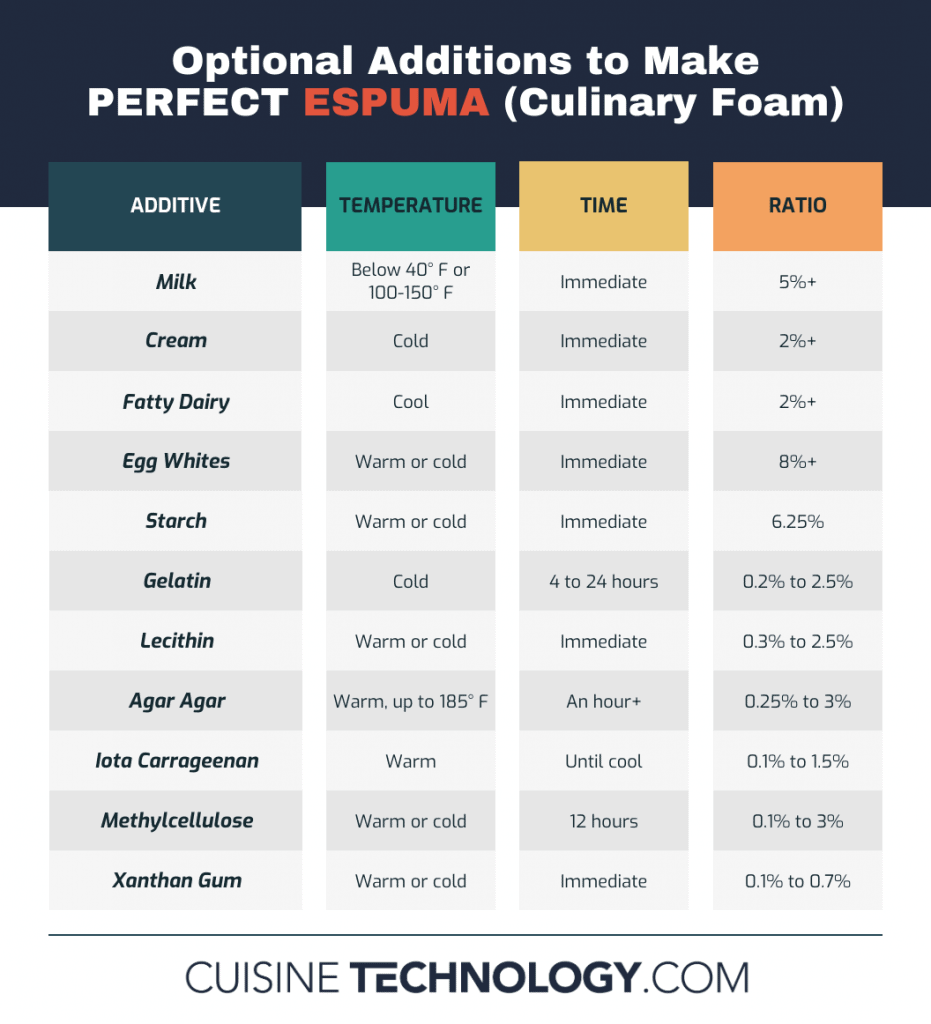
There are too many variables to give you a quick one-size-fits-all answer, so we’ve compiled a list of many of the common additives below in this article, with information on each.
If you’re just starting out and want a simple answer, we recommend making your first espuma with gelatin. Here’s how!
- Add anywhere between 0.2% and 2.5% gelatin to your liquid (following the manufacturer’s instructions on how to hydrate the gelatin first).
- Heat the liquid to melt the gelatin, then strain it into your whipping siphon.
- Charge the siphon with N2O and shake it vigorously, then put it into the refrigerator.
- After 4 to 24 hours, remove the siphon from the refrigerator. Shake again, then dispense your espuma.
Keep in mind that since espuma is a type of foam, it’s full of air. This means that the flavor of whatever you’re using will be somewhat diluted. When in doubt, go for slightly stronger flavors or mixtures until you get the hang of the technique and can adjust it to your taste.
Making Espuma Without a Whipped Cream Dispenser
I get it: the iSi Gourmet Whip is pretty expensive and can be hard to justify if you only want to make foam occasionally. (We have seen it on sale, though, so check the Amazon listing to see whether you’re lucky enough to catch a deal!)
And while espuma is generally technically supposed to be made with a siphon like this, you don’t actually need it to create culinary foam. Here are some alternatives using tools you’re more likely to already have around the house!
- A milk frother. Use this to froth your liquid of choice! If you don’t manage to turn all of it into foam, use a spoon to scoop the foam off the top to apply to your dish.
- An immersion blender. You may need to tilt the blender slightly to bring the blades out of the liquid to help incorporate air into the mixture. This goes against our usual advice on how to use an immersion blender, and may result in some splashing, but should create a foam!
- An electric hand mixer or a manual egg beater. You’ve probably used one or both of these already to make whipped cream or to beat egg whites. You can use them the same way to make culinary foams!
Espuma Additives and Stabilizers
Before we begin: Modernist Cuisine is an absolutely incredible resource for learning about culinary foams. There, you’ll find fascinating pictures of foams made with each kind of additive, which will help you decide which is best to achieve the texture you want.
Depending on what you want to turn into a culinary foam, you may find that you need some additives to help it foam up and/or keep its shape. Without additives, your foam may not have the texture you want, or you may find that it melts away almost immediately.
In general, you’ll need to use an additive if your preparation doesn’t contain fat.
There are quite a few options, and this is where your creative and experimental nature can really shine. (After all, if you’re into modernist techniques, it’s because you love playing in the kitchen, right?) There’s a good chance that your first attempts won’t be absolutely perfect, and that it will take some trial and error to figure out which additives to use for the result you want.
With that said, here’s some information on the most common choices to help you get started!
Milk and Cream
These aren’t traditional ingredients in an espuma (which was created in part to get away from cream-based foams), but they’re common household ingredients that serve their purpose well. Depending on what you’re making, you may find they’re the ideal choice!
Without getting too far into the science, the proteins in milk react to heat in a way that creates relatively long-lasting bubbles when you froth or foam the milk. If you want to make a hot foam, milk can be a great choice as a stabilizer.
Remember that it’s the proteins in milk that form the foam, not the fat. And fat adds another whole level of complication. Skim milks, with their lower fat content, tend to create stronger and more stable foam—that also tends to be stiffer and drier than that made from whole milk.
There’s no right or wrong when it comes to which kind of milk to use for foams; it’s just a question of which characteristics you want your espuma to have.
When we get to cream, the fat plays a more significant role. It’s this relatively high level of fat that lets whipped cream develop the silky, dense texture that we all know and love. If you want an espuma with these characteristics, cream may be the perfect choice for your espuma.
Remember that milk holds bubbles better while hot, and cream does better when it’s cold. Keep this in mind when choosing what to use for your espuma, since the temperature will affect how these ingredients behave.
Other Fatty Dairy
Cream is the obvious option, but other high-fat dairy products can also help you create an espuma. Options include:
- Yogurt
- Melted butter
- Crème fraîche
- Mascarpone (thinned with liquid)
- Cream cheese (thinned with liquid)
While not actually dairy, egg yolks work similarly as well. Their fat allows them to be a great addition to create espuma from liquids that otherwise wouldn’t be foamy.
Egg Whites
Another nontraditional espuma addition, egg whites deserve a place on the list because they do their job well and are probably in your kitchen already!
Like milk, egg whites depend on proteins (not fat) to form and hold a foamy texture. In fact, this is why it’s so important to avoid getting egg yolk into the whites you want to whip! The fat from the yolk interferes with the tendency of the proteins in the white to form the bonds that lead to foam.
If you want to make an espuma with common ingredients you have on hand, but milk and cream don’t fit the style or flavor profile, consider egg whites instead. Whip them lightly before adding them to your dispenser along with the other ingredients, then dispense.
Egg whites work best at a cool room temperature, so they aren’t the best choice if you want a hot foam. And keep in mind that because they don’t foam well when in contact with fat, you shouldn’t use them in fatty preparations. Instead, they work well with water-based applications.
Of course, follow all food safety guidelines around using raw eggs!
Starch
Starch can work well as your stabilising agent to create your espuma. The most common choices are potato starch, rice starch, and corn starch, which you may already have on hand!
One of the great things about starches is that they work in either hot or cold preparations, unlike many other options. If you’re looking for that level of versatility (for example, if you’re not sure whether you want your espuma to be hot or cold, and want to taste it before committing), this is a great place to start.
However, you need to heat the starch in the liquid for it to work. You can then either dispense it while hot or warm, or cool it to your chosen temperature.
To use this technique, thicken your liquid of choice with starch. (Remember to use a slurry to avoid lumps! This means mixing the starch with a small amount of hot liquid until smooth, then pouring that mixture into the rest of your liquid.) Heat the liquid to basically activate the starch. Strain into your siphon, charge, shake, and dispense. (Or cool to your desired temperature before dispensing.)
Gelatin
This is an easy choice for many preparations because you can probably buy it at your local grocery store (which may not be the case for some of the remaining options on the list!).
One important point to note is that gelatin only works for cool or cold preparations, not for warm or hot ones.
To use gelatin:
- Soak the sheet or sheets in cold water for 5 to 10 minutes, then squeeze out the excess water.
- Put the soaked gelatin sheets into the liquid that you want to use for your foam.
- Warm the mixture gently, stirring to dissolve the gelatin.
- Strain the mixture into your siphon, charge, shake vigorously, and then cool in the refrigerator for 4 to 24 hours. (The time it takes depends on how much gelatin you used.)
Alternatively, you can heat the liquid while soaking the gelatin sheets, then stir the gelatin into the warm liquid to dissolve it.
Depending on the preparation you’re making, it may be easier to dissolve the gelatin in a small amount of heated liquid, then stir in other liquids (cool or at room temperature).
The amount of gelatin you should use depends on the final outcome you want, with a typical range falling between 0.2% and 2.5%. For example, iSi recommends a 1.8% gelatin to liquid ratio for their Pina Colada Espuma. Other uses may take as little as 0.75% or even less. The more you use, the faster your espuma will be ready, and the firmer it will be.
Lecithin
Lecithin, which is most commonly derived from soy, shares some characteristics with milk in terms of the scientific reasoning behind why it makes foam. That is, it has both hydrophilic and hydrophobic molecules, which cause it to form relatively stable bubbles when whipped or frothed.
But what does that science mean for you? Basically that you can use lecithin to create an espuma immediately, without needing to wait for hours as you do with some other options.
To use lecithin, simply whisk it into the liquid you’re using as the base for your foam, then make your foam. Lecithin works (and dissolves) in both hot and cold water, making it a very flexible choice for various applications.
In general, use a ratio of anywhere from 0.5% to 2% lecithin in your liquid mixture. In other words, for every 500 ml of liquid, use 2.5 grams to 10 grams of lecithin. (As a side note, yes, the metric system makes this kind of culinary math easier, even for us Americans!)
The amount you should use within this range depends on the characteristics of your liquid. If you’re using something that already foams somewhat, but you want a stronger foam, stick to the lower end of the range. But if you’re using a liquid that doesn’t naturally foam or froth at all, lean toward the higher end.
Agar
Agar is fascinating in that once it sets as a gel (at 90–104° F), it will remain in gel form when reheated all the way up to its melting point of 185° F. This means that it’s ideal for espumas that you want to serve warm without sacrificing the quality of the foam. For most uses, aim for a ratio somewhere between 0.25% and 3%.
But because of these characteristics, it’s somewhat more complicated to use than other additives. You can’t just stir it into warm liquid then use it immediately. Instead, you need to dissolve it, let it gel, and then turn it into an espuma.
To use agar:
- Mix the agar into the liquid of your choice.
- Bring the mixture to a rolling boil for five minutes.
- Transfer the boiled mixture to the refrigerator to cool and set. The mixture will need to cool to below 90° F to properly set.
- Put the cooled and set mixture in a blender and blend until it reaches a smooth consistency.
- Transfer to your siphon, charge with N2O, and shake.
- Warm the siphon in a warm water bath to between 90° F and 185° F before dispensing and serving.
Iota Carrageenan
Carrageenan is a stabilizer, but not a foaming agent. What this means for you is that you should only use it with liquids that are capable of foaming, but struggle to maintain a foam that lasts as long as you want. This may mean either that you’re using a foam-capable liquid as your base (such as milk or cream), or that you’ve used other additives to enable your base liquid to create foam.
To use iota carrageenan, dissolve it by blending it into cold liquid. Next, heat the liquid to hydrate and activate the carrageenan. You’ll need to bring the temperature to at least 158° F, according to Modernist Cuisine. Let it cool just until it gels (104° F to 158° F), then use the mixture while it’s still warm. For most espumas, use a ratio of 0.1% to 1.5% iota carrageenan.
Methylcellulose
This substance is both a foaming agent and a stabilizer, so it’s a great choice if your base liquid doesn’t foam or froth.
While methylcellulose hydrates in cold liquid, it doesn’t melt until it reaches at least 59°F. This means that you should first dissolve the methylcellulose in your liquid while it’s 59°F to 122° F, and then cool the liquid to below 59° F for at least 12 hours to let the substance hydrate.
Note: there are many different types of methylcellulose, all of which have slightly different properties. But in general, use a 0.1% to 3% ratio.
Xanthan Gum
If you’re struggling to find a solution that works for the temperature you want, xanthan gum may be a great choice. It isn’t temperature sensitive like most other options; instead, it starts working its magic as soon as it’s in liquid (of any reasonable temperature).
While xanthan gum can be used on its own, it also works well in conjunction with agar-agar or gelatin, depending on the result you’re trying to achieve! It’s a useful stabilizer, so consider adding it if you’ve achieved the espuma that you want but find that it melts away too quickly.
To use xanthan gum, simply dissolve it in the liquid of your choice, using the xanthan at a ratio of 0.1% to 0.7%. Keep in mind that it’s not a foaming agent, so the liquid you use will need to be capable of creating foam, which the xanthan gum will then stabilize.
Conclusion
Making espuma, or culinary foam, is as easy or difficult as you want it to be. It can be as simple as steeping something flavorful in milk and then frothing it with a milk frother, or as complicated as figuring out the precise combination and ratios of ingredients to make your foam Michelin-worthy.
If you’re serious about your espumas, we recommend the iSi Gourmet Whip, which is a whipping siphon that can handle both warm and cold preparations. But if you just want to casually make foam once in a while, an immersion blender, a frother, or even a whisk should work just fine.
While it takes some experimentation (with plenty of trial and error), figuring out how to make what you consider the perfect espuma will help you add that extra bit of flair to your meals. It’s a great way to bring the elegance of fine dining into your gourmet home cooking.
Further reading and sources: