Here’s how the story goes: searing a steak before sous vide cooking locks in the flavor, and searing afterward re-develops the nice crust created by the Maillard reaction. Therefore, the claim is that you should sear your steak both before and after putting it in its sous vide bath.
But is it true? With so much conflicting information available, we decided to put the theory to the test ourselves. We compared steaks seared before and after sous vide with steaks seared only afterward to figure out whether there was a difference, and whether it’s worth the extra hassle.
Note: we didn’t bother testing fully unseared steaks, or searing only before and not after. As far as we can tell, no one recommends either of these methods, and for good reason! A steak definitely needs to be seared after sous vide cooking. The only question is whether it should be seared before cooking too.
Table of Contents
Is It Better to Sear Before or After Sous Vide Cooking? Our Experiment Setup
We wanted to try this with different cuts of meat, so we went to our favorite local butcher (The Butcher’s Mistress at Riverside Market in Christchurch, New Zealand) and got four steaks:
- Two gorgeous ribeyes
- Two beautiful sirloins
We ensured each pair of steaks was as similar as possible in both weight and shape (they’re just a few grams off from each other). This means our test can be as pure as possible, without significant variations in size or surface area.
With each pair of steaks, we seared one both before and after its sous vide bath, and one only after.
Here’s the process we used for the seared-both-before-and-after ribeyes:
- Get a cast iron pan super hot, then add a thin layer of avocado oil (selected for its neutral flavor and high smoke point)
- Sear each side of the steak for just long enough to develop a nice crust, approximately 45 seconds per side
- Allow to cool at room temperature for about 30 minutes before bagging and vacuum sealing
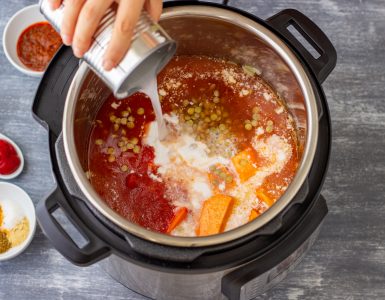
- Cook in the sous vide bath (along with the matching unseared steak from the pair)
- Put into an ice bath for 5 minutes to quickly chill the outside and minimize the effects of searing on the overall temperature of the steak
- Remove from the bag, pat dry, and season with just salt (keeping the experiment as simple as possible!)
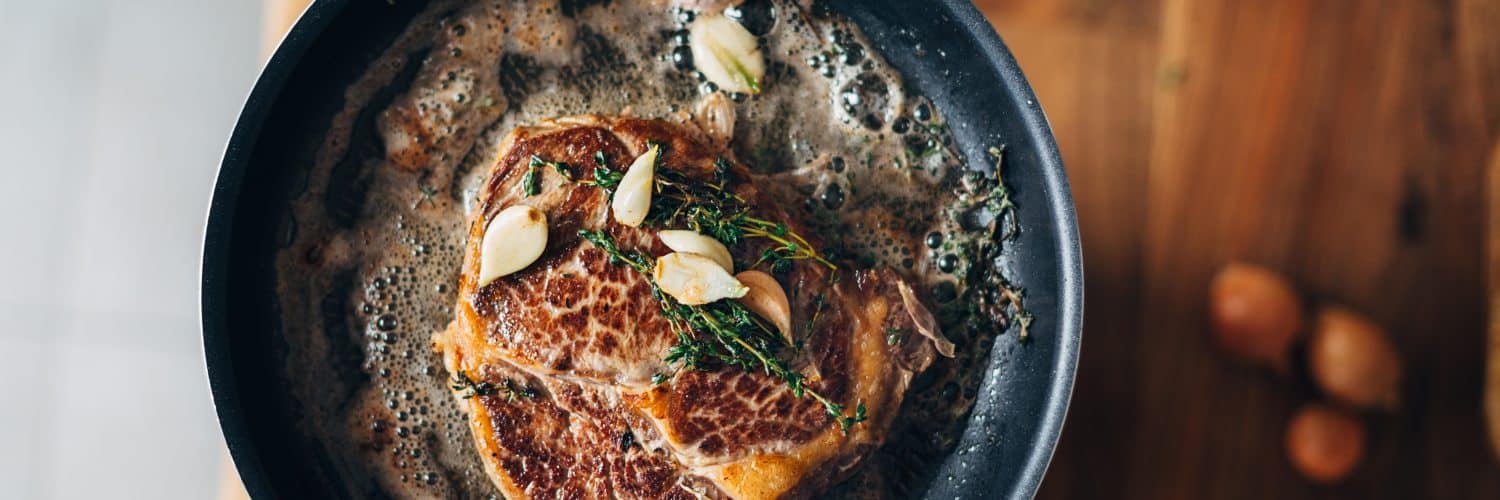
- Sear again in the same way as before (super hot cast iron pan, avocado oil) for just long enough to re-develop the nice crust, approximately 45 seconds per side
And here’s what we did for the ribeye steaks seared only after the sous vide bath:
- Bag individually, vacuum seal, and cook in the sous vide bath (along with the matching unseared steak from the pair)
- Put into an ice bath for 5 minutes to quickly chill the outside and minimize the effects of searing on the overall temperature of the steak
- Remove from the bag, pat dry, and season with just salt (keeping the experiment as simple as possible!)
- Sear in a super hot cast iron pan with a thin layer of avocado oil (selected for its neutral flavor and high smoke point) for just long enough to develop a nice crust, approximately 45 seconds per side
Our process for the sirloins was similar. The only difference is that we did not use an ice bath. Instead, we submerged the bags in cold tap water for 5 minutes. This was to assess whether an ice bath plays any role in the decision of whether to sear twice or just once.
I expected one of two things to happen. Either:
- The steaks seared both before and after sous vide cooking would be too unevenly cooked thanks to the double sear, with the familiar overcooked outer halo that we’re used to. This would, of course, defeat a lot of the purpose of sous vide cooking, which is all about getting a perfect and even cook throughout.
- Searing both before and after would result in an amazing crust. On the one hand, this would be the perfect outcome, right? But on the other hand, it would be disappointing, because it would mean that you need to go to the extra work to get the best possible result.
So what actually happened? Is it worth doing the double sear, or is it okay to sear only afterward? Read on to find out.
Our Experiment Results:
Let’s dig right into the details of what happened in our searing experiment.
The steaks seared both before and after their sous vide bath:
- Had a darker, richer crust
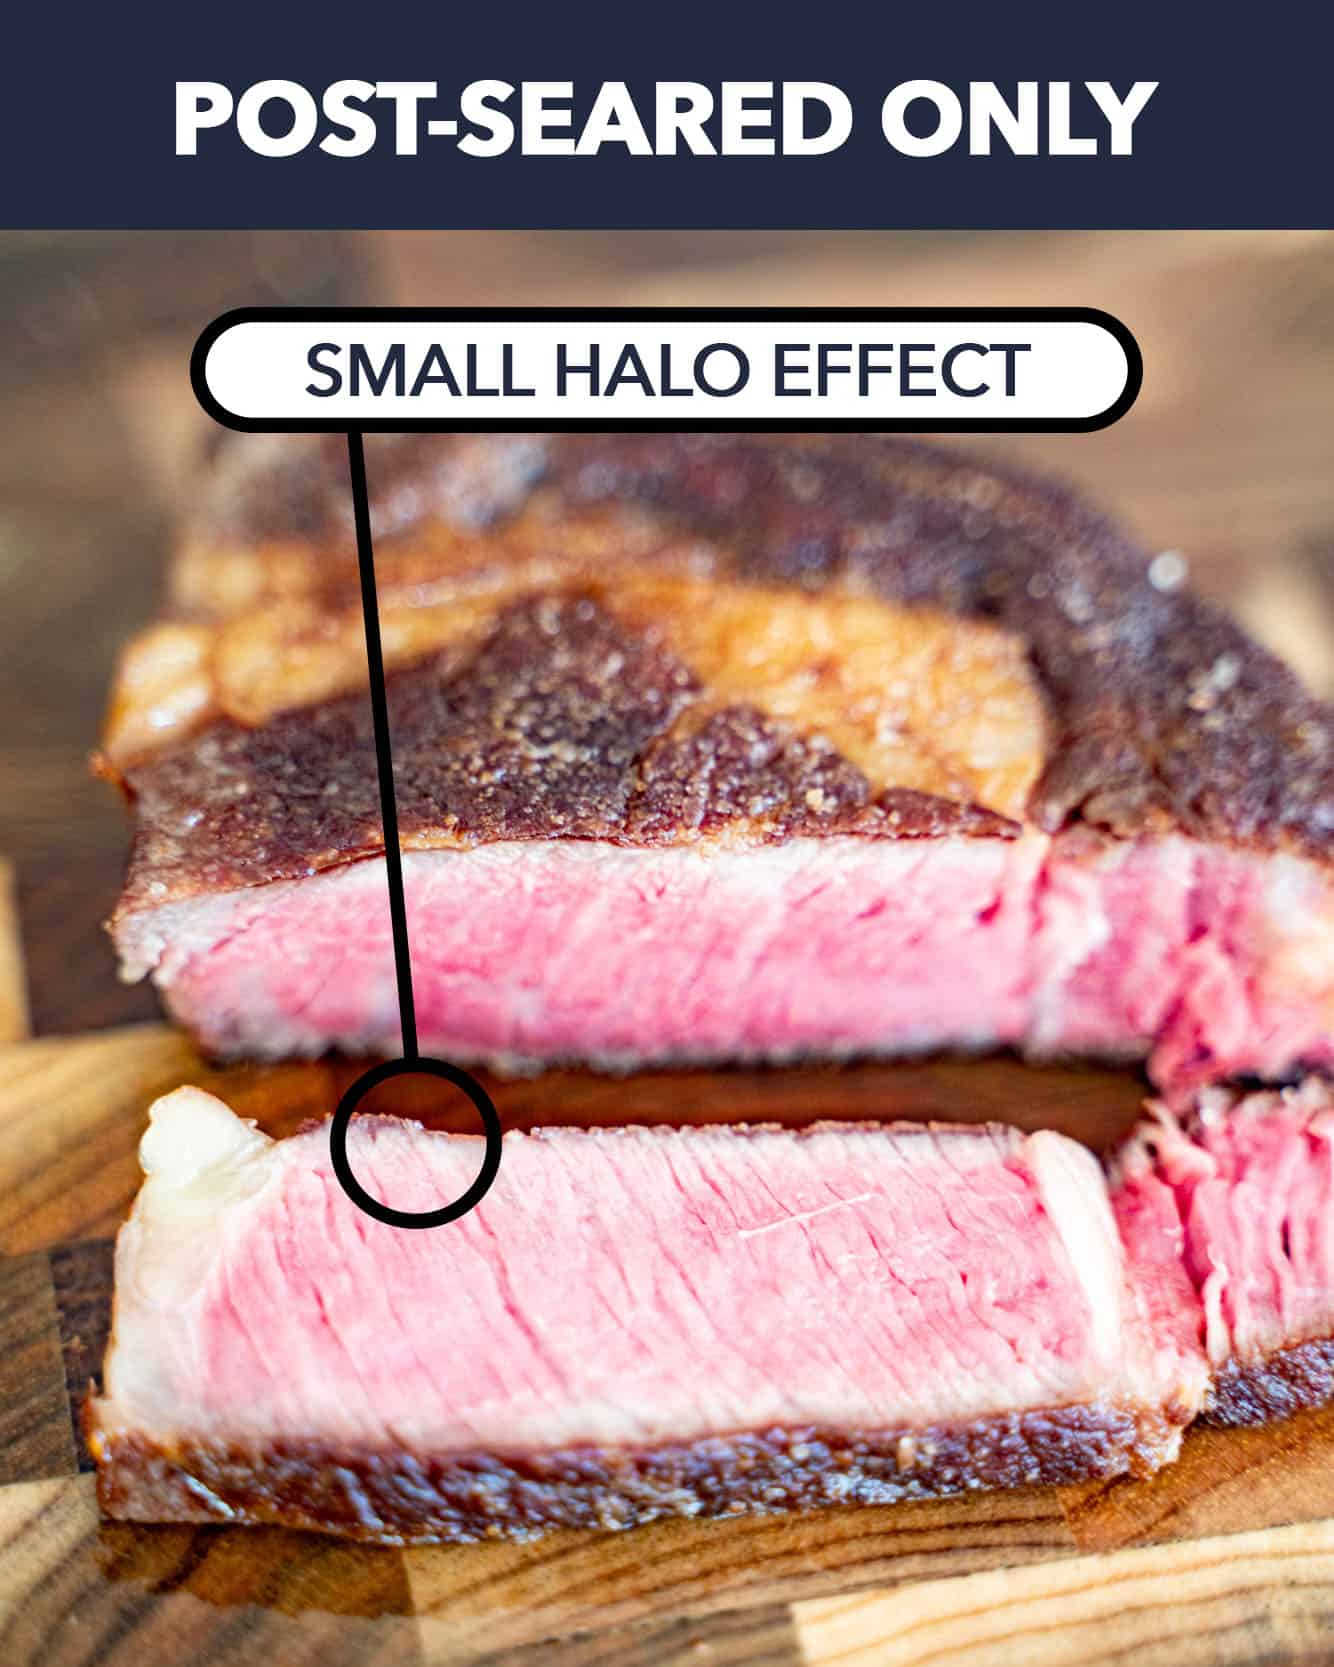
- Had less of a halo effect; the overcooked area from the sear was limited to just barely past the crust
- Created a distinctly richer, more flavorful jus in the sous vide bag
- Resulted in less jus (29 grams for the pre-seared ribeye, compared to 37 grams for the ribeye seared only afterward)
- Tasted distinctly less seasoned despite using the same amount of salt
On the other hand, the steaks seared only after their sous vide bath:
- Had a lighter, more patchy crust with less perfect coverage
- Had more of a halo effect; the overcooked area from the sear extended visibly further into the steak
- Created a noticeably less flavorful jus in the sous vide bag
- Resulted in more jus (37 grams for the ribeye that was sous vide without being seared first, compared to 29 grams for the ribeye seared before cooking)
- Tasted as seasoned as we would expect given the quantity of salt used. This was distinctly more seasoned than the steak seared before its sous vide bath.
We definitely noticed a distinct difference in the size of the overcooked halo from the sear after a 5-minute ice bath compared to the 5-minute cool tap water bath.
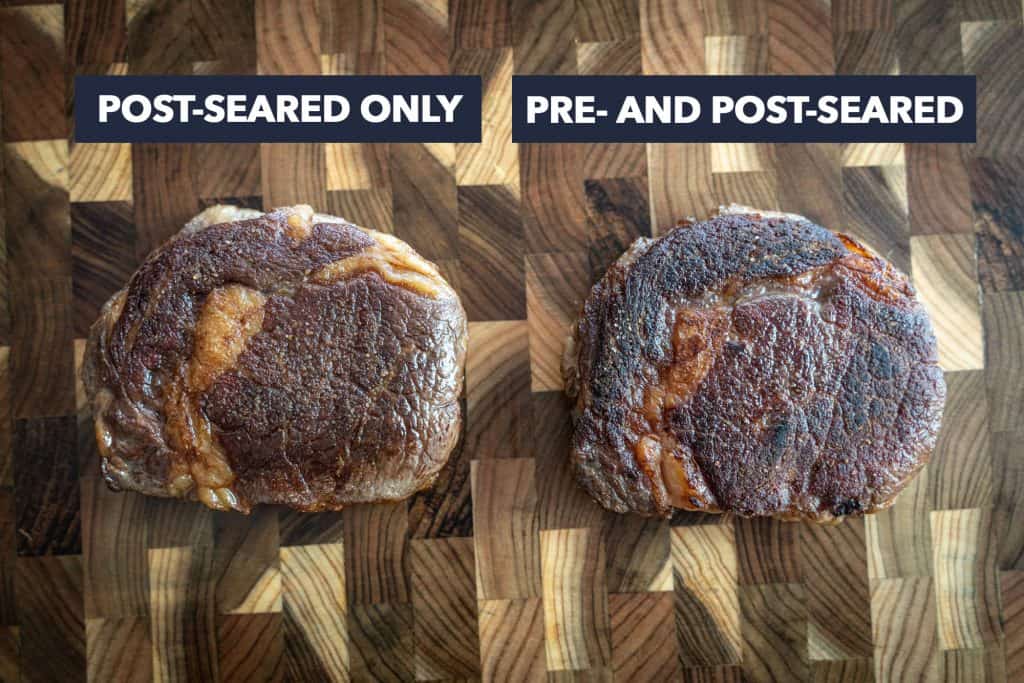
The crust was richer, darker (without being burned), and more even. To my surprise, the steaks seared twice (before and after) had noticeably less of a halo effect than the steaks seared only once. Maybe this is because the pre-seared crust took the brunt of the heat during the post-sous-vide sear, blocking more of the heat from getting into the steak itself.
We didn’t notice a difference in flavor throughout the steak, so the idea that searing first “locks in flavor” wasn’t accurate in our experiments. The crust, however, was slightly more flavorful in the pre-seared steak.
The jus in the bag was definitely richer and more flavorful in the steaks we seared before cooking them.

Our Conclusion: Should You Sear Before or After Sous Vide Cooking?
Searing your steaks both before and after sous vide cooking them produced a slightly better result in our experiments. However, it does take several extra steps and some extra time.
We recommend searing both before and after if you’re really serious about your steaks, or if you particularly want to impress someone with the best meal possible. It may also be a good choice if you want to use the bag jus for a sauce, since searing beforehand results in a richer, more deeply flavorful jus.
For everyday meals, the slight improvements we found with a before-and-after sear aren’t worth the extra hassle compared to just searing afterward. We here at Cuisine Technology have agreed that this is something each of us would do for special occasions, but that for typical dinners, we wouldn’t generally bother.
Keep in mind that if you do sear first, you’ll need to use more salt before the final/second sear than you would otherwise. In our experiments, we found that the steaks seared before and after tasted dramatically less salty than those only seared afterward. (We only salt after sous vide cooking, so your results may vary if you salt in advance.)
Read our post on how to sous vide a steak perfectly every time for a full guide to our method, which takes our various experiments (including this one) into account!
Can You Sous Vide and Sear Later?
Yes.* Regardless of whether you sear before you cook your steak, you can do the final sear later. For this technique, you’ll need to quickly cool down your steak after it’s done in the sous vide bath, ensuring that it stays in the food temperature “danger zone” for as short a time as possible.
We recommend using an ice bath to cool it quickly, then putting it into the refrigerator. (Simply moving it straight from the sous vide bath into the refrigerator won’t cool it anywhere near as quickly.)
This technique gives you the option of doing your sous vide cooking in advance, whether that’s a few hours or even a couple of days. Just be sure to reheat your steak before you sear and serve it; a refrigerator-cold center with a seared outside isn’t particularly appealing!
Some options for how to reheat refrigerated sous vide food before searing it include:
- Keep it in the vacuum bag. Before searing, put the bag back into a sous vide bath that’s a few degrees lower than the original cooking temperature for just long enough to warm it through.
- Keep it in the vacuum bag. Before searing, put the bag into a large bowl or pot full of hot tap water that’s a few degrees lower than the original cooking temperature. Leave it there for just long enough to warm through. (The only advantage here over the first option is that you don’t need to pull out your sous vide machine again.)
- Remove the food from the vacuum bag, pat dry, season, and put on a baking sheet in a warm oven for just long enough to warm through. (Don’t overheat your oven; the goal here is just to re-warm your steak to slightly below the original temperature, not to bake it!)
Throughout this process, please be mindful of the food temperature “danger zone” and don’t do anything risky.
After your food is reheated, it’s time to sear. If you kept it in the vacuum bag to reheat it in a hot water bath, you’ll now remove it from the bag, pat it dry, and season it. If you reheated it in the oven, it should already be seasoned and ready to go. However, if it’s wet enough to need to be patted dry again, reseason lightly to make up for any salt that washed off as the juices came out in the oven.
To sear your previously refrigerated sous vide food, use a super-hot cast iron skillet (we recommend heating it for approximately 10 minutes first) with a thin layer of neutral oil with a high smoke point. We prefer avocado oil for this process. Place the patted-dry and seasoned food into the preheated pan and sear for as little time as possible to develop a nice crust. For steaks, this is typically about 45 seconds per side.
*While you can sous vide your food in advance and sear it later, we don’t recommend it if you can avoid it. This process typically won’t improve the quality of your food, and may make the texture slightly worse. Instead, we recommend scheduling your sous vide cooking so that you can sear the food promptly after it’s done. Since sous vide cooking is so flexible with timing, it should usually be simple to schedule the process so that your preferred cooking time falls within the sous vide window.
With that said, we understand that there are times when you need to sous vide in advance and then sear and serve later. That’s why we’ve included the detailed instructions above, to help ensure you get the best possible result even if you can’t immediately sear your sous vide food.
Can You Refrigerate Sous Vide Meat Before Searing?
Yes, but are you sure you want to?
There are two main reasons why people typically want to refrigerate their sous vide meat before searing it:
- To store it for a few hours or days until it’s time to sear and serve it. If this is why you want to refrigerate your sous vide meat, read the above section “Can You Sous Vide and Sear Later?” In short, yes, you can do this—but we don’t recommend it if you have the option of avoiding it.
- To cool the outer layer of the steak before searing it. Cooling the outer layer of sous vide meat gives you more time to sear, because the heat takes longer to reach (and overcook) the inner layers of the food.
Again, if your reason for refrigeration is #1 (to serve later), see the above section.
If you’re in category #2, though, and want to refrigerate your meat to reduce overcooking and increase searing time, we have good news. You don’t need to.
You see, before you refrigerate your sous vide meat, you should put it in an ice bath anyway. This cools it more quickly, which promotes better food safety and also avoids the issues that come with putting hot food straight into your refrigerator. And that ice bath is enough to cool the outer layers of your sous vide meat. So you can just put the bag into the ice bath, cool the meat for a few minutes, and then dry, season, and sear. There’s no need to go through the extra step of refrigerating it.
Note: all of this assumes that you’re going to be cooking the food promptly and only want to refrigerate the food to cool it for a better sear without overcooking the food. If you’re not going to be cooking the food right away, please refer to the section above “Can You Sous Vide and Sear Later?” You can definitely do this, but for food safety reasons, you will need to refrigerate your food if you’re not going to finish and consume it promptly. To learn more, read our article on food safety in sous vide cooking as well as the USDA’s information on the food temperature “danger zone.”
How Do You Sear After Sous Vide?
Here’s the short, step-by-step answer:
- Open your windows and turn on your stove ventilation! Things are going to get smoky.
- Heat a cast iron pan on high heat for about 10 minutes.
- As the cast iron pan heats, remove the steak from the sous vide bath and put the whole thing (still in the bag) into an ice bath for 5 minutes.
- Remove the bag(s) from the ice bath, take out the steak, and pat as dry as reasonably possible with paper towels. Season with salt to taste.
- Apply a thin layer of avocado oil to the preheated cast iron pan.
- Add the steak(s) to the pan and sear for 45 seconds on each side for a standard sear. For a darker sear, cook for a total of 60 to 90 seconds on each side, flipping every 30 seconds to minimize overcooking of the meat. Finish by searing the sides until done.
Read on for more details!
The Preheat:
We preheat a cast iron pan on the highest heat possible for 8 to 10 minutes. This ensures it’s super hot, which minimizes the searing time and therefore helps keep the inside of the steak from overcooking.
The Ice Bath:
Regardless of whether you also seared before sous vide, you’ll need to put the still-sealed bag into an ice bath to cool down the outside as much (and as quickly) as possible. This allows you to sear the steak without significantly further cooking it, so you won’t accidentally end up with it being nicely seared but overcooked. We usually do this for 5 minutes; that’s long enough to cool the outside without chilling the steak through.
We’ve tested other options (the refrigerator, the freezer, a chilled plate, cold tap water) and have found that an ice bath works best. This step really does make a difference, so don’t skip it!
Drying and Seasoning:
It’s so important to get your steak as dry as (reasonably) possible before searing it. Any water on the surface will turn to steam, which lowers the temperature and interferes with that gorgeous Maillard reaction.
We only season steak immediately before searing after the sous vide bath. Our experiments have found that seasoning before the sous vide bath offers a slightly improved crust, but at the cost of the tenderness of the overall steak. For us, this tradeoff isn’t worth it, so we season after the sous vide bath.
Keep in mind that if you seared your steak before you sous vide it, you’ll need more salt for the same level of seasoning than if it went into the sous vide bath raw and unseared. We think that the pre-seared crust holds onto less of the salt, so it takes a bit more salt to achieve the same level of seasoning as an unseared steak.
Oiling the Pan:
We like to use avocado oil for this process, because it has a neutral flavor and a high smoke point. Feel free to substitute another oil with these same properties, though!
You only need a thin layer; don’t go overboard! Once we put it in, we give the pan another moment to ensure the oil is super hot too before adding the steak. This is also why we choose to oil the pan instead of the steak; the oil is already hot by the time the steak goes in, instead of taking a few precious seconds to heat up on the steak.
Sear the Steak:
Things move pretty quickly from this point, so I like to set my timer in advance. For a standard sear, I set it to 45 seconds. For an extra-deep sear, I set it to 30 seconds. Yes, this seems backwards, but here’s why:
- For a standard sear, I sear each side of the steak once for 45 seconds.
- For an extra-deep sear, I sear each side of the steak two or three times for 30 seconds each time, for a total of 60 to 90 seconds on each side.
I’ve found that a 60-second uninterrupted sear is too long, and results in too much overcooking. Flipping the steak every 30 seconds lets you cook it for slightly longer without cooking too far into the steak.
Sear the sides until done, typically a maximum of 45 seconds each.
Conclusion
Searing a steak both before and after you sous vide it has noticeable, although subtle, benefits. For everyday meals, we don’t think the extra hassle is worth it. While the differences are there, honestly you probably would never even notice them unless you’re specifically looking for them.
However, since the double-sear method is slightly better, we recommend searing both before and after sous vide for special occasions, when you want to impress, or if you’re using a particularly nice steak that you want to prepare perfectly. When you really want to go that extra mile above and beyond, this extra step can help you get just that little bit closer to culinary perfection.