Sous vide cooking promises the perfect steak, but does it follow through? It definitely can, but the process is a little more involved than just throwing a steak in a bag, putting it in hot water for a while, then serving it. We’ve done various side-by-side tests for different steps of the process to figure out exactly how to sous vide a steak, and here’s what we’ve discovered!
This is the procedure that we’ve agreed produces the absolute best results. It’s ideal when you want to impress or wow someone for a special occasion, or when you have a really gorgeous steak that you want to do justice to. However, it does require a few extra steps. If you want a quicker and simpler technique that still makes a great steak, keep reading! We’ve also included our shortcut procedure, which is great for typical everyday meals.
Table of Contents
How to Sous Vide a Steak Perfectly: Our Step-By-Step Process
Here’s the quick version of how we sous vide steaks after plenty of research, trial, error, experimentation, and testing! Keep reading below these short steps to learn more details.
- Heat a cast iron pan on high heat for approximately 10 minutes, then add a thin layer of avocado oil.
- Sear each side of the steak for 45 seconds each to develop a crust.
- Allow to cool at room temperature for 20 to 30 minutes, then bag and seal with a vacuum sealer (or use the water displacement method). Meanwhile, preheat your sous vide bath.
- Sous vide the steak at your desired temperature for approximately 2 hours.
- Just before the steak is done, start preheating your cast iron pan over high heat again. Also, prepare an ice bath.
- Transfer the steak (still in its bag) into the ice bath and leave there for 5 minutes to cool the outer layer.
- Remove the steak from the bag. Pat dry with paper towels, then season generously with salt.
- Once the cast iron pan has been preheating for about 10 minutes, add a thin layer of avocado oil.
- Sear the sous vide steak again for approximately 45 seconds each on the top and bottom. This will redevelop the crust you created previously. Optionally, use a torch on the top to further develop the sear.
- Sear each of the edges of the steak for 15 to 30 seconds.
- Enjoy!
Let’s go over each of the steps in order to explain exactly why we do things in the order we do! Our process is the result of various tests and experiments, so some of the choices that seem unusual are actually due to our own experiment results.
Step 1: heat your cast iron pan. When you want to sous vide a steak, you need to sear the outside quickly and at very high temperatures to avoid accidentally cooking through the steak. We love cast iron for its ability to retain and transmit heat! Heating it on high for 10 minutes before searing your steak ensures that the pan is evenly blazing hot with no cool areas.
We then add a thin layer of avocado oil a few seconds before putting in the steak. Oiling the pan instead of the steak ensures that the oil is already hot by the time the steak goes in, saving those few extra seconds. We choose avocado oil for its neutral flavor and very high smoke point.
Step 2: sear each side of your steak. Now that your pan is blazing hot and has a thin layer of oil, it’s time to add the steak. Since everything is so hot, this initial sear won’t take long; we give it 45 seconds on each side (with a timer to make sure we don’t accidentally overcook it!). As I mentioned before, it’s important not to actually cook your steak, and just to sear it, so a short time on hot heat is important.
You can optionally sear the sides now too, but it isn’t strictly necessary. We do this after the sous vide bath, but you can do it both before and after if you’d prefer.
Step 3: allow the steak to cool, then bag it. We like to let the steak cool at room temperature at this point. Repeatedly heating and cooling a steak can have negative effects on the texture, and we find that letting it cool at room temperature is much gentler than putting it into an ice bath (which you’ll need to do later anyway). We leave it on the counter, covered with a mesh lid, for approximately 20 to 30 minutes to cool.
Note: always keep sous vide food safety best practices as well as the food temperature “danger zone” in mind when cooking. Our entire process as outlined here takes under 4 hours, but you definitely should limit the time your steak spends at room temperature and not leave it sitting out for hours. That’s why we limit the cooling time to a maximum of 30 minutes.
As the steak cools, preheat your sous vide bath so that it’s ready to go as soon as your steak is done. You can choose your desired temperature based on how done you like your steak. We generally opt for medium-rare at 130° F (54.5° C) for most steaks.
After 20 to 30 minutes, your steak should have cooled enough that it’s just barely warm to the touch (or even room-temperature). At this point, put it into a bag and seal it. You can either use a vacuum sealer or the water displacement method.
Step 4: sous vide the steak. As I mentioned above, most of the team here at Cuisine Technology agrees that medium-rare at 130° F (54.5° C) is the ideal temperature for most steaks.
Cook the steak for approximately two hours at your chosen temperature. This is long enough to cook through an average steak, which is what this guide is about. If you’re cooking a larger piece of meat (like an entire tri-tip, for example), you’ll need to adjust the time accordingly to ensure it’s cooked all the way through.
Step 5: A few minutes before your steak is ready, prepare an ice bath and put your (cleaned!) cast iron pan back on the stove over high heat to preheat for another 10 minutes.
Step 6: give your steak an ice bath. Once your steak is done, transfer it (still in the bag) to a prepared ice bath. Aim for about half water and half ice, although a little less ice is fine. Leave it in the ice bath for 5 minutes, stirring every minute or so to make sure all sides of the steak get chilled.
Your goal here is to quickly and thoroughly chill the outer layer of the steak, not to get it cold all the way through. That’s why the ice bath is so short! (If you were rapidly cooling a steak to refrigerate for later, you would leave it in the ice bath longer.) Cooling the outer layers lets you give the steak a nice hard sear without cooking it further, because the outer layers are cold enough that they don’t easily transmit heat to the center.
Step 7: prepare the steak for its final sear. Remove it from the ice bath, then take it out of the bag. (Save the juices if you want to use them for a sauce!) Place it on a layer of paper towels on a clean plate, then pat the top and sides dry with paper towels too. The drier the better!
Season generously with salt. A pre-seared steak doesn’t hold salt as well as one that’s raw or wasn’t seared before the sous vide bath, so we recommend using a bit more salt than you normally would to achieve the same result.
Step 8: prepare your pan. By now, your pan should have been on the heat for about 10 minutes, so it should already be blazing hot. Just like before, add a thin layer of avocado oil (or similar oil; neutral flavor with a very high smoke point) to the pan.
Step 9: sear the steak (again). You’ve probably noticed by now that the seared crust you created before sous vide cooking the steak got soggy and soft during the cooking process. Now that your steak is cooked, chilled, and seasoned, it’s time to sear it again to re-develop and darken that beautiful crust.
Place it into your preheated and oiled cast iron skillet for 45 seconds on each side. If you want to, you can add a pat of butter and a sprig of rosemary to the pan as soon as you flip the steak and baste the top with the hot butter. But be aware that these temperatures are high enough that the butter solids will likely scorch.
If you have a kitchen torch (especially if it’s a torch that’s strong enough for this kind of use), you can optionally torch the top of the steak as it’s in the pan. This will help develop the sear.
Note: we find that 45 seconds on each side is consistently enough to create a gorgeous dark brown sear. However, for a darker and even more intense sear, you can sear each side for 60 to 90 seconds instead of 45. The risk of searing for so long is that you’re more likely to cook deeper into the steak, which of course we want to avoid. To minimize this issue, turn the steak over every 30 seconds.
Step 10: sear the edges. By now, you’ve noticed that the top and bottom of the steak are gorgeously seared. But the sides aren’t! Use tongs to hold the steak on each side for long enough to sear, 15 to 30 seconds (go a bit longer if there’s a particularly fatty area that you want to render).
Step 11: enjoy! A steak this perfectly cooked speaks for itself and doesn’t need much in the way of sauce. However, if you saved the juices from the bag, you can toss those into the pan with other ingredients and flavorings of your choice to make a quick pan sauce. While a sous vide steak doesn’t need to rest (because it’s already evenly cooked through), it won’t suffer from sitting for a couple minutes while you prepare the sauce.
Why Sear Before AND After?
We’ve gone back and forth about this, and finally decided to run some proper side-by-side tests of steaks seared before and after sous vide compared to steaks seared only after.
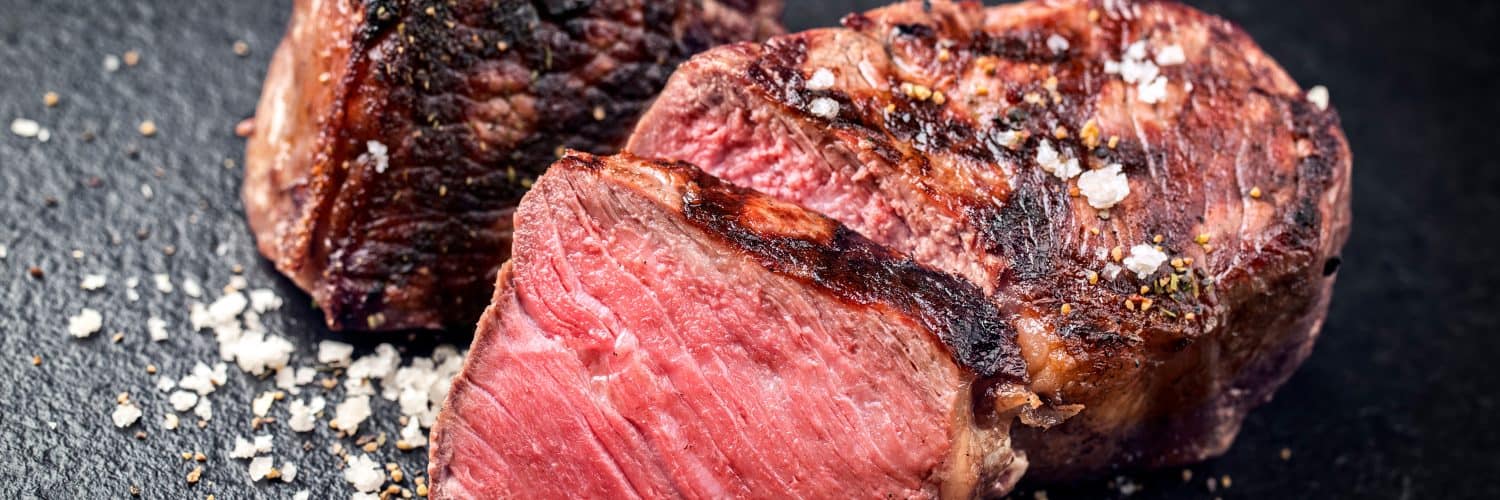
Our experiment found that the twice-seared steaks developed a better crust. To my surprise, they also had less of a halo effect; the overcooked outer layer (which is inevitable when you sear a steak that’s already perfectly cooked) didn’t extend nearly as far into the steak.
So as counterintuitive as it may seem, searing twice actually results in a more perfectly cooked steak with less of an overcooked halo. You can see the results for yourself in our post about our experiments determining whether to sear before or after sous vide cooking.
With that said, the results aren’t significant enough to go through the extra trouble if you’re feeling lazy. For an average dinner, the team at Cuisine Technology agrees that the first sear isn’t necessary. However, this post is all about making the perfect sous vide steak, and the double-sear method is definitely better.
Why Not Salt Before Sous Vide?
This is another side-by-side test we’ve done (check out the results here!). At first glance, the idea of salting a steak before sous vide cooking it sounds great because the salt theoretically should penetrate further. However, the reality is that the salt draws out moisture, resulting in a slightly tougher steak.
We didn’t notice any significant flavor difference between a steak salted before sous vide cooking and one salted afterward. Of course, it’s important to season before the final sear! We definitely don’t recommend searing a sous vide steak without salt and then only salting it at the table; the flavor of the crust ends up disappointingly lacking.
Since there isn’t any flavor improvement though, and we do find a slight loss of texture quality, we recommend seasoning a sous vide steak only after its sous vide bath. Our procedure for the final steps of the perfect steak is to dry, season, sear, and serve.
Note: after a sous vide bath, a pre-seared steak holds less salt than an unseared one. In our side-by-side tests, the steak that wasn’t seared before its sous vide bath was as seasoned as we would expect given the amount of salt we used. Applying the exact same amount of salt to a pre-seared steak resulted in a noticeably under-seasoned final product. Keep this in mind as you season! We recommend using about 30% more salt for a pre-seared steak than you would for an unseared one.
Why Do We Only Season With Salt? What About Pepper?
You may have noticed that our procedure calls for only salting the steak before the final sear, not adding pepper. Here’s why: a cast iron pan that’s been preheated on high for 10 minutes is astonishingly hot. At those temperatures, pepper can char and burn, adding acrid flavors to the steak. If you enjoy these flavors, by all means go for it and add pepper along with the salt before the final sear.
Since we don’t like the acrid, burned flavor, though, we don’t add the pepper first. Instead, we do the final sear with salt only, optionally adding butter and a sprig of fresh rosemary halfway through. While the butter solids may scorch at these high temperatures, we find that they add more of a nutty charred flavor instead of the acrid burned flavor that comes from pepper.
For that nice kick of pepper, we either make a quick pepper sauce to pour over the steak, or simply crack fresh pepper over the steak at the table. This gives you all the benefits of the flavor without the risk of burning the pepper.
The Shortcut Version: How to Sous Vide a Great Steak More Easily
If this sounds like a whole lot of work for a steak, you’re right. It’s worth it for a truly special occasion, and all of our tests were designed to figure out the absolute best way to make a sous vide steak.
Realistically, though, does your everyday steak need to be perfect? Or just downright amazing? If you can handle not-quite-perfection, you can skip several steps and save yourself time.
Instead of doing a pre-sear, just move forward a few steps in the process. Put the steak into the bag raw, seal it, and sous vide. From there, follow the steps as described.
Another shortcut you can take is to skip the ice bath, or to replace it with popping the steak into the freezer on a chilled plate for a few minutes. You’ll definitely get more of a halo effect, but it’s a lot less effort.
For easy reference, here’s our guide to how to sous vide an amazing steak, which skips some of the steps involved in making a perfect steak:Preheat your sous vide bath to your desired temperature (we generally go for medium-rare at 130° F (54.5° C) for most steaks.
- Put your steak into a bag and seal it, either with a vacuum sealer or the water displacement method.
- Cook the steak for approximately 2 hours (although sous vide cooking is flexible with time!)
- Just before the steak is done, prepare an ice bath (optional) and start preheating your cast iron pan.
- Remove the steak from the sous vide bath. Optionally, put it into the ice bath for 5 minutes. Alternatively, you can place it on a chilled plate in the freezer for a few minutes.
- Pat the steak dry, season as you normally would (no need for the extra salt you’d use on a pre-seared steak), and sear in your cast iron skillet for 60 to 90 seconds on each side, in 30-second intervals. In other words, flip your steak every 30 seconds until it’s had a total of two to three turns on each side (or until the crust develops to your taste).
- Sear the sides of the steak to taste. Enjoy!
How Long Does It Take to Sous Vide a Steak?
For an average steak of about 1” thick, you should aim for a minimum of 90 minutes (to ensure it’s cooked through) and a maximum of 4 hours (to maximize quality and ensure safety). Our guide calls for 2 hours on the assumption that you’re cooking an average-sized steak. If yours is significantly thicker, you may find that you need to cook it for longer to make sure the whole thing reaches the target temperature.
Conclusion
Making the perfect sous vide steak is straightforward, but involves some precise steps. We’ve discovered that salting after the sous vide bath, searing both before and after, and using an ice bath between the sous vide bath and the final sear are key components of making the best steak possible. However, for an amazing steak without the extra hassle, you can skip the first sear and even the ice bath. The results won’t be perfect, but they’ll still be incredible.


