This page may contain affiliate links. If you make a purchase through one of these links, we may earn a commission at no extra cost to you.
Evaporation as a cooking technique might sound advanced and even intimidating, but in fact, many of the cooking techniques you frequently use rely on (or create) evaporation. It’s the key to thickening teriyaki sauce without cornstarch, and the reason that you leave the lid on the pot when you make rice.
And while you probably already encounter evaporation during cooking often, understanding how it functions will help you harness its power so that you can achieve the results you want.
But before we dive into its cooking applications in too much depth, let’s first go over the basics of what evaporation is. In short, it’s the process of a liquid entering into a gas state—turning into vapor. As water evaporates when you’re cooking with heat, it turns into steam in the air. Over time, this lessens the volume of water in your pot or pan. Read on to understand which substances do (and don’t) evaporate, and how to control the evaporation rate in your cooking.
Table of Contents
Alcohol Evaporation During Cooking
Let’s start with the big one: alcohol evaporation. We’ve all heard that alcohol “cooks off” or “bakes off,” but is it true?
Sadly for anyone watching their alcohol consumption, no. Or at least, not at the rate that most cooks expect. It’s absolutely true that alcohol will evaporate during cooking, but you can’t count on getting rid of all (or even most) of the alcohol with a standard relatively quick preparation.
We consulted the United States Department of Agriculture’s detailed study on alcohol retention and found the following surprising information.
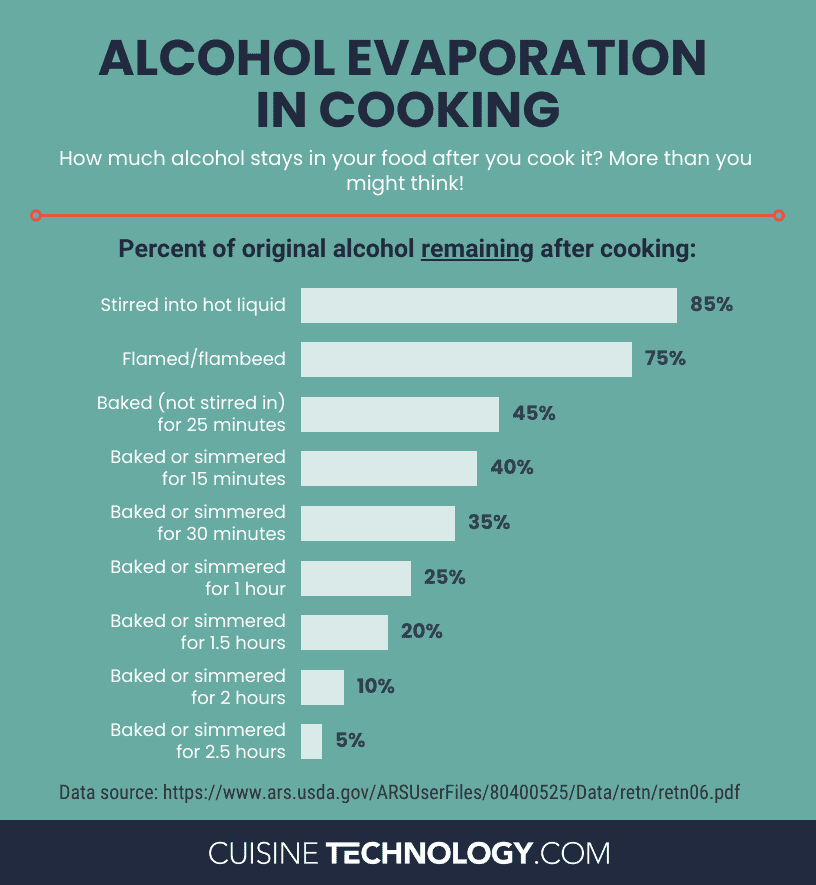
To remove 94% to 96% of the alcohol in a wine-based sauce would take 2 1/2 hours of simmering. And if you’re making a quick pan sauce with a splash of wine, chances are it’ll be done in a matter of a few minutes. In this sort of preparation, you can expect that the majority of the alcohol will still be in the finished product, with potentially only 15% to 40% cooking off.
Even more surprising is the information about alcohol burning off in a flambéed preparation. After all, literally catching the alcohol on fire until it burns out must get rid of basically all of the alcohol, right? After all, if there were still lots of alcohol, it would keep burning, wouldn’t it?
Again, no. Take a moment to guess how much alcohol by percentage remained after a fairly long 48-second flambé in the USDA’s tests.
Believe it or not, even this long flambé left 77% to 78% of the alcohol in the dish. That means that only 22% to 23% cooked off.
So in summary, alcohol does evaporate during cooking, but at a much slower rate than many of us have long believed. The graphic below compiles more data published by the USDA to help you figure out how much alcohol might remain in your dish after you cook it!
Vinegar Evaporation During Cooking
If you’ve ever made or eaten a balsamic reduction, you already know that vinegar can evaporate during cooking. In fact, that’s how balsamic reduction is made; you simply heat balsamic vinegar until enough of the water evaporates that it becomes lusciously thick.
But what about other vinegars? Can you reduce apple cider vinegar, for example?
The technical answer is yes, you can reduce any vinegar. Reducing it simply means cooking it and allowing it to evaporate until the volume of liquid in the pot… well… reduces. But not all vinegars are created equal this way.
Because we didn’t want to be just theoretical, we put two vinegars to the test to illustrate this point. We bought a decent-quality bottle each of balsamic vinegar and apple cider vinegar, then reduced them with all the variables as controlled as possible.
First, we made a standard balsamic reduction to precisely assess the temperature and time it would take.
Our 2 cups of balsamic vinegar took 32 minutes to transform into almost exactly 1/2 cup of a rich, glossy balsamic reduction.
Next, we repeated the process exactly with the apple cider vinegar. We used the same pan (after washing it and returning it to room temperature) and the same heat level, and cooked it for 32 minutes as well.
The 2 cups of apple cider vinegar disappeared into only 1.5 teaspoons of reduction.
In a flavor comparison, the balsamic reduction was tangy, sweet, and complex. The apple cider vinegar reduction was puckeringly sour; it tasted like most of the apple flavor evaporated out and left only the acidity of the vinegar behind. (And imagine all of the acidity of two cups of vinegar condensed into 1.5 teaspoons!)
In short, trying to reduce most vinegars into a balsamic-style reduction is a waste of both time and vinegar. However, an interesting point we noticed in our experiment is that the apple cider vinegar evaporated much more quickly than the balsamic vinegar. As you work with evaporation, keep in mind that different types of vinegar evaporate at different rates, and plan accordingly.
Does Cooking Oil Evaporate?
Now we’ve talked about water-based liquids, it’s time to dig into oils. If you’ve ever noticed the sticky residue on your vent hood after doing a lot of frying, you may have (very reasonably) thought that the oil evaporated and then landed there just as water steam might.
In fact, the oil that forms that residue didn’t technically evaporate. Instead of being the result of oil vapor, the residue simply consists of tiny droplets of oil that either splattered upward or were carried up by hot air or steam. The oil itself didn’t become a gas.
If you’ve ever noticed that certain cooking oils that have been left out for a long time dry up, this might not make sense at first. After all, when things dry up, it’s typically due to evaporation. Oil is different, though. A certain category of oils called “drying oils” are in fact capable of drying out, as you’ve observed, but the process has nothing to do with evaporation. Instead, the process of oxidation basically “cures” the oil and eventually leaves it dry even though it hasn’t evaporated. (Fascinatingly, you can learn more about this from painters rather than chefs.)
How Do You Slow Down Evaporation in Cooking? How Do You Speed It Up?
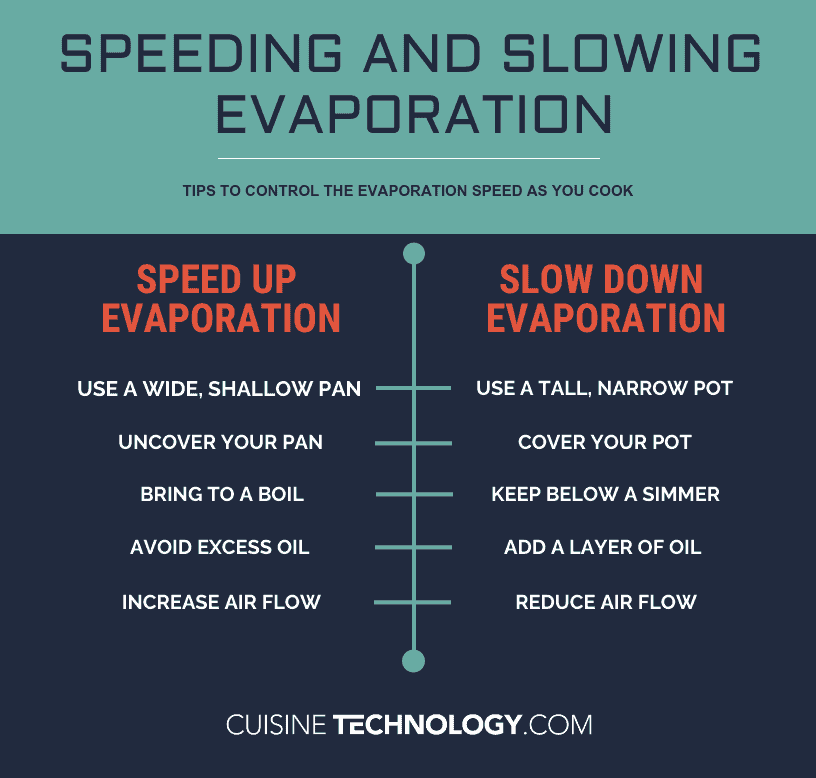
Now that we’ve talked about which substances do or don’t evaporate, let’s dig into controlling the rate of evaporation. Depending on what you’re cooking, you might want to speed up the rate of evaporation (to hurry up a loose, wet sauce into a thick, rich one, for example) or slow it down (so that you don’t need to keep refilling the water in a pot or pan that keeps getting too dry).
Slowing down evaporation.
While you can’t completely stop evaporation, you have some choices to help you dramatically slow it down. First, opt for a cooking vessel that’s taller and narrower, rather than shallower and wider. The more surface area the vessel has, the faster the liquid will evaporate (everything else being equal, of course).
Another option is to cover your pot or pan. This doesn’t technically stop the evaporation process, because the water still turns into steam (vapor). However, the lid then catches most of that steam, and the resulting condensation drips back down into the pot.
Hotter liquids evaporate more quickly. If you only need to keep something warm and want to reduce the evaporation rate, don’t hold it at a simmer or boil. Reduce the heat as much as possible to achieve your goal.
Finally, keep in mind that only molecules on the surface of the liquid can evaporate. This means that if you put a layer between the water-based liquid and the air, the evaporation rate will be dramatically reduced. So if you’re cooking something low and slow, try pouring a layer of oil over the water-based liquid to form a barrier and reduce evaporation. This won’t work effectively if the water is boiling or simmering, but it can be a great option for dishes that are hot but not hot enough to simmer.
Bonus tip: air movement over a water-based liquid encourages evaporation. If you’re desperate to reduce evaporation as much as possible, consider turning off any fans in the kitchen to keep the air as still as possible.
Speeding up evaporation.
Basically, you’ll want to do exactly the opposite of what you would do to slow down evaporation. This means:
- Use a shallow, wide cooking vessel
- Don’t cover your pot or pan
- Bring your liquid to a boil (if appropriate for your recipe)
- Avoid mixing oil into the water-based liquid unless it’s at a boil or simmer
- Use a fan to encourage air movement over your pot or pan
Examples of Evaporation in Cooking
You probably already use evaporation as a technique frequently in your kitchen, even if you don’t think of it in those terms. For example, it’s a factor at play when you:
- Thicken a sauce simply by continuing to cook it
- Make a balsamic reduction
- Keep simmering a stew to make it thicker and richer
- Cover a pot to keep the steam inside (like when you’re making rice)
- Uncover a pot to let the steam out
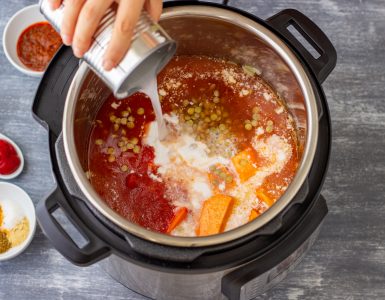
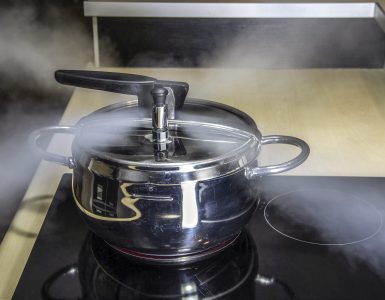
- Use a pressure cooker
- Make ghee
- Leave space between food items in your pan so that they sear instead of steam
Other Cooking Techniques
Want to learn more about cooking? Check out some of our other guides: