This page may contain affiliate links. If you make a purchase through one of these links, we may earn a commission at no extra cost to you.
So you’re ready to sous vide. You’ve heard all about how it makes perfectly cooked foods every time, and how little attention it takes. You know that you can’t wait to wow your guests at your next dinner party with your better-than-a-restaurant dishes. You’re already prepared with a bunch of recipes that you want to try.
All that’s missing is your starter sous vide kit.
To be honest, there’s very little that you need to buy to get started on your sous vide journey. If your kitchen is already decently stocked, you might actually need to buy only one thing that you don’t already have: a sous vide machine.
Read on to learn exactly what you need to start sous vide cooking at home, and which optional items are nice to have. While some of the optional pieces make life easier, you can definitely buy them down the line if you’d rather start simply.
Table of Contents
Must-Have: Sous Vide Machine
First and foremost, you need a sous vide machine. Yes, it’s technically possible to sous vide on the stovetop with a thermometer, but we don’t recommend it for a number of reasons. In particular, it’s far less precise than a sous vide machine (and precision is kind of the point of sous vide). Plus it’s easy to fall into the food temperature “danger zone” if you’re not paying super-close attention. We just don’t recommend it.
There are two basic types of sous vide machines: an all-in-one machine and an immersion circulator. We recommend (and personally prefer to use) an immersion circulator. You simply clip this device onto the side of a container of your choice to turn it into a sous vide bath. The circulator regulates the water temperature and keeps it exactly where it should be.
Our favorite immersion circulator is the Anova Culinary Sous Vide Precision Cooker, which strikes the perfect balance between excellent function and reasonable price. If you want to learn about other options, check out our list of the best sous vide immersion circulators.
Must-Have: Plastic Bags
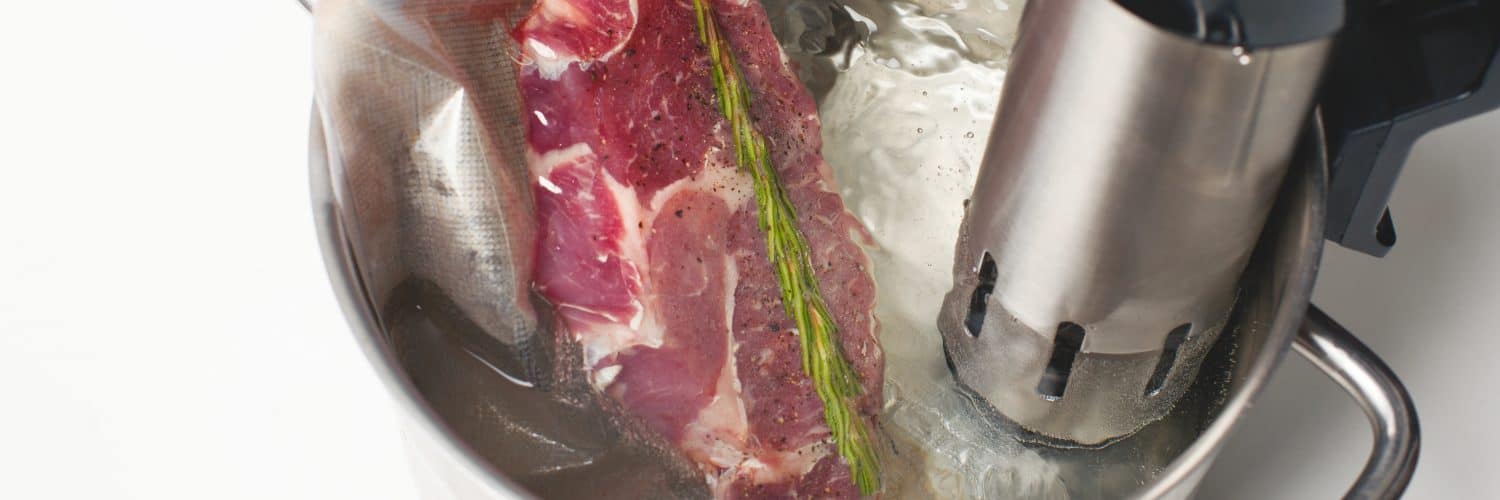
When you cook something in a sous vide bath, you need to protect it from the water. This is typically done with plastic bags (although it’s possible to do it with glass jars in some cases).
As with most things sous vide, there are a lot of fancy (and often expensive) options out there.
But especially when you’re getting started, you really don’t need any of those! We recommend simply starting with Ziploc-brand resealable bags. (Other brands can work too, but Ziploc specifically is BPA-free and dioxin-free. If you want to use another brand and care about these substances, do your research first!)
Must-Have: Large Container
The only other absolute must-have when you start sous vide cooking is a large container. It needs to comfortably fit the food you want to cook with plenty of room for the water to circulate around it. It also needs to be large enough for your sous vide immersion circulator to fit inside with enough water to reach above its minimum fill line.
Sure, you could buy a fancy container specifically for your sous vide projects, but why would you? Since you’re passionate enough about food to want to sous vide, chances are pretty good that you already have a stockpot or canning pot that’s large enough.
Note: if you’re using an all-in-one sous vide machine instead of an immersion circulator, the container is already part of a machine. You don’t need a second, separate container.
Nice to Have: Vacuum Sealer
Don’t let anyone tell you that you need a fancy, expensive vacuum sealer to get started with sous vide cooking. You absolutely don’t! If you have a Ziploc bag and a container large enough to comfortably hold it, you’re good to go. (And you’ll need a container like this to sous vide in anyway, so you don’t need anything extra.) Simply use the water displacement method to remove most of the air, then seal the bag and get cooking.
Once you’re serious about sous vide, though, a vacuum sealer is definitely nice to have. It removes more air than the water displacement method, and you may find that the bags that work with these machines may hold up better to the elevated temperature and prolonged cook time of the sous vide process. Plus vacuum chamber sealers even let you use various other vacuum cooking techniques!
If you want a suction vacuum sealer, we recommend the Anova Precision Vacuum Sealer, which is purpose-built for sous vide. We appreciate the straightforward interface, small size, and very reasonable price. For chamber vacuum sealers, our recommendation is the Avid Armor Chamber Vacuum Sealer Model USV20 Ultra Series. It’s a great machine at a very fair price that also includes an external vacuum port, giving you more flexibility on how you use it. For more options, you can head over to our lists of the best external suction vacuum sealers (generally more affordable, but somewhat limited) and the best chamber vacuum sealers (pricier but more versatile and powerful).
Nice to Have: Kitchen Torch
Once your food finishes its time in its sous vide bath, it will be perfectly cooked through and through… but depending on the food, it may be sadly lacking on the outside. Meats, in particular, tend to be better with a nice browned outer crust.
You can definitely finish off your food in a hot pan, so you don’t need a torch! The only problem is that we’ve found that a hot pan can all too easily cook your food instead of simply searing the outside, which reduces the benefits of the sous vide technique.
Instead, we prefer to use a kitchen torch. We’ve found that it doesn’t heat the food as much as a pan, enabling us to get a nice sear without significant further cooking.
Nice to Have: Smoking Gun
The reliable perfection and temperature precision of sous vide cooking doesn’t come without its costs. With this gentle technique, you miss out on some of the flavors that come from harsher, more fiery cooking methods. One of the flavors that’s notably missing is that of smoke… and a smoking gun lets you add it right back!
These devices work by blowing the smoke created by smoldering wood chips (or tea, herbs, hay, spices, etc.) in its chamber out through a tube. You can either blow the smoke straight onto your food, or blow it into a contained area with your food to let it soak in. If you’ve ever watched a cooking show and seen a glass cloche full of smoke dramatically billowing out to reveal a plate of elegant food within, you’re already familiar with this concept.
If you’re ready to take your sous vide meals to the next level by infusing them with deliciously smoky flavor, we recommend the PolyScience Breville Gun Pro Smoke Infuser. We love that it lets you adjust the smoke intensity! For other options, you can check out our list of the best smoking guns for cooking.
Starter Sous Vide Kits for Everyone
Don’t want to do all the research yourself? Don’t worry, we’ve done it for you! Here are three examples of sous vide starter kits depending on your needs and budget. Whether you’re just curious to try it and don’t want to spend much, or want to become the next sous vide master with the best of everything, one of these below kit ideas should be perfect for you!
The Bargain Hunter: Only the Necessities
- Sous vide machine: Inkbird WIFI Sous Vide Cooker
- Bags: Ziploc bags (likely already owned)
- Container: large stock pot (likely already owned)
The Comfortable Chef: Quality and Convenience
- Sous vide machine: Anova Culinary Sous Vide Precision Cooker
- Bags: vacuum seal bags compatible with your vacuum sealer
- Container: large stock pot (likely already owned)
- Vacuum sealer: Anova Precision Vacuum Sealer
- Kitchen torch: any should do!
The Sous Vide Connoisseur: Nothing But the Best
- Sous vide machine: PolyScience CREATIVE Series Sous Vide Immersion Circulator
- Bags: vacuum seal bags compatible with your vacuum sealer
- Container: large stock pot (likely already owned)
- Vacuum sealer: Avid Armor Chamber Vacuum Sealer Model USV20 Ultra Series
- Kitchen torch: any should do!
- Smoking gun: PolyScience Breville Gun Pro Smoke Infuser